Installation
Spanish Installation Instructions
FlowGuard Gold® is joined using a fast and easy one-step solvent welding process that eliminates the need to use a separate primer. Local codes determine which method is acceptable in your area, but the two-step method is more commonly used in the U.S. These directions are an overview of the instructions created by the Plastic Pipe and Fittings Association. Before any installation, verify local codes and manufacturer approved instructions.
FlowGuard Gold CPVC Installation Quick Reference English
Step-by-Step Instructions
1. Cut the pipe
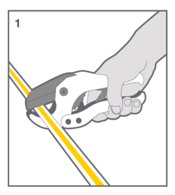
FlowGuard Gold can be cut using ratchet cutters*, wheel cutters or a fine tooth saw. When cutting into previously installed FlowGuard Gold, avoid use of ratchet cutters as these may compromise the integrity of the repair. If any indication of damage to the pipe is visible at the piping end, cut back at least 2” beyond the visible damage.
*Do not use ratchet cutters on previously installed pipe.
2. Prepare the pipe and fittings
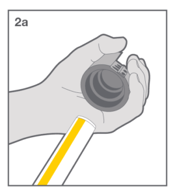
(a) Remove any burrs or filings and bevel the end of the pipe using a chamfering tool. If a chamfering tool is not available, a sharp knife or file are suitable, but not preferred.
Using a clean, dry rag wipe away any dirt and moisture from the joint surfaces.
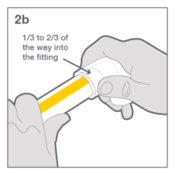
(b) Check the fit of the pipe and fitting, the pipe should make contact with the socket wall 1/3 to 2/3 of the way into the fitting socket. If the pipe goes all of the way into the fitting at this stage, discard the fitting.
Immediately proceed to Step 3, do not check the fit of multiple fittings at once as this can increase the risk of an installer forgetting to solvent weld one or more of the connections.
3. Apply FlowGuard Gold One-Step Solvent Cement
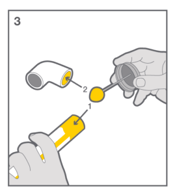
Apply a heavy, even coat of FlowGuard Gold one-step solvent cement to the outside of the pipe end. Then, using the same applicator, without additional cement to apply a thin coat inside the fitting socket. Do not allow excess cement to puddle in the fitting and pipe assembly.
Most local codes allow the use of one-step solvent cements, always verify your local code requirements. Ensure proper coverage of cement on the pipe and fitting. Too little solvent cement can result in gaps and leak paths and too much solvent cement may puddle in the fittings and/or pipe softening the material. To help avoid dry-fits, FlowGuard Gold solvent cements are available with a specially formulated UV indicator that allows the contractor or installer to verify solvent welded joints using a simple UV flashlight.
4. Assemble the joint
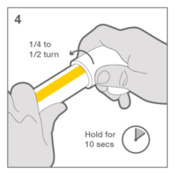
Immediately after applying solvent cement, insert the FlowGuard Gold pipe into the fitting, rotating the pipe ¼ to ½ turn while inserting to ensure even distribution of cement. Properly align the fitting and hold the assembly for approximately 10 seconds, allowing the joint to set.
5. Verify proper installation
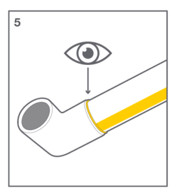
An even bead of cement should be visible around the joint. If this bead is not visible it may indicate that solvent cement was not properly applied. In this case, disassemble and remake the joint to ensure system integrity.
Dry-fits are extremely rare and completely avoidable with proper installation practices. Verifying the presence of a continuous solvent cement bead at the fitting is a critical step to ensure system integrity.
A reminder that these directions are a generalization of the instructions created by the Plastic Pipe and Fittings Association. Before any installation, please confirm the correct instructions from the manufacturer and any local codes.
Do's & Don'ts of Installation
- Do not pre-assemble the plumbing system without solvent cement, this increases the risk of dry-fit failures.
- Ensure proper coverage of cement on the pipe and fitting. Too little solvent cement can result in gaps and leak paths, and too much solvent cement may puddle in the fittings and/or pipe softening the material.
- Dry-fits are extremely rare and avoidable with proper installation practices. Always visually inspect the joint to verify the presence of a continuous bead of solvent cement at the fitting.
- Always allow room for expansion and contraction of the pipe.
- Do not place hangers or straps that restrict the natural movement of the pipe caused by expansion and contraction.
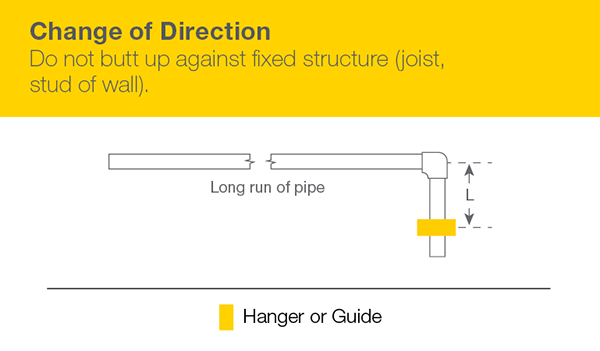
- Do not butt-up elbows or tees against fixed structures (joists, studs, walls, etc...).
- Never use scissor-type pipe cutters.
- When cutting into aged pipe, use a fine tooth saw or wheel cutter. Do not use ratchet cutters on aged pipe.
- Never install plumbing pipes in uninsulated areas which may be subject to freezing.
- Avoid excessive stress in the system.
- Only use chemically compatible ancillary building products.
Solvent Welding Instructional Video
Expansion & Contraction
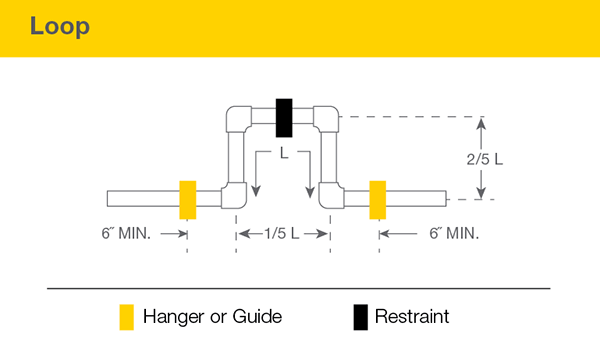
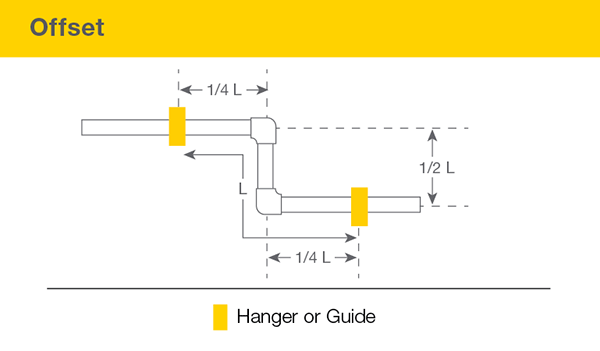
FlowGuard Gold CPVC will expand about 1 inch per 50 feet of straight length of pipe per 50°F temperature increase. Expansion and contraction mainly affect hot water lines, but can affect cold water lines when they are installed in unusually hot or cold conditions. It is important to follow a few best practices when allowing for expansion & contraction including:
- Do not put additional stress on the pipes or fittings in an expansion loop, offset or change of direction.
- Do not restrict natural movement of the pipe in the direction of expansion and contraction.
- Always leave adequate spacing between elbows and hangers/restraints.
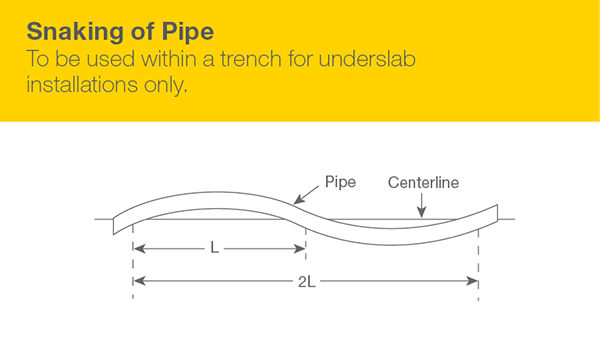
In most cases, expansion & contraction can be accommodated with normal changes of direction. For long, straight runs loops or offsets will be necessary. For underslab installations, install the pipe so that it snakes from side to side in the trench to allow for expansion and contraction.
FlowGuard Gold Manufacturer Approved Instructions
Always refer to local codes and the manufacturer’s instructions for the specific FlowGuard Gold manufacturer you are using:- Charlotte Pipe and Foundry Company
- Bow Plumbing Group
- Cresline Plastic Pipe Co.
- E-Z Weld (Solvent Cement)
- NIBCO
- Oatey (Solvent Cement)
- Weld-On (Solvent Cement)


